Building the Chrome Dino Game from scratch in Flutter
In this post, we’re going to run down building Chrome’s offline dinosaur game using Flutter.
First, I want to start off by saying that you could definitely do this with something like Flame, the Flutter game engine but I think there's value in seeing how the sausage gets made so we're going to do this with standard components we get out of the box with Flutter.
Sprites
All of the imagery for the dino game is piled into one image called the sprite sheet, you can check this out for yourself by going to chrome://dino and looking at the image requests:
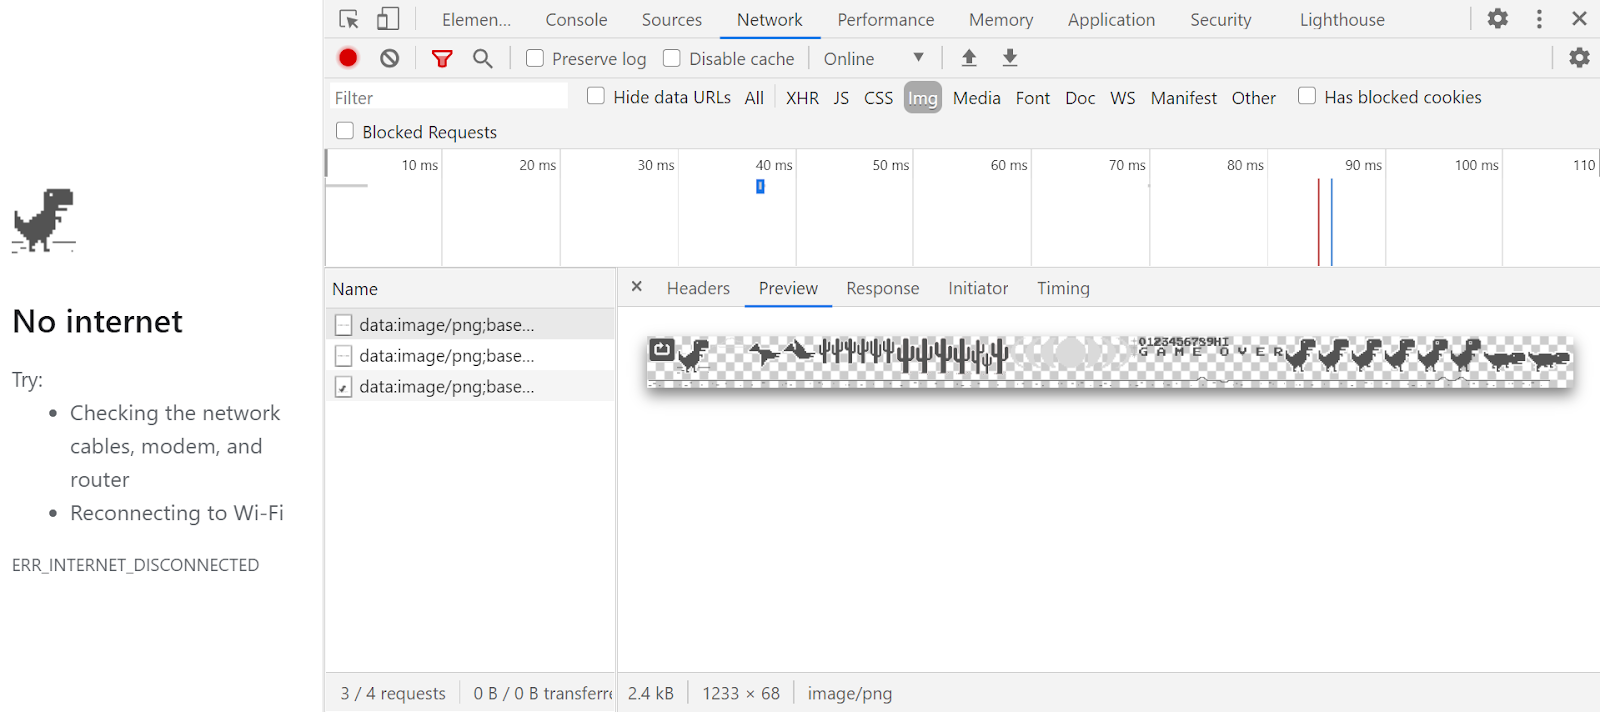
Figure 1: The network request for the sprite sheet for the dino game
For simplicity's sake in coding this game, I've split this sheet up into a few sub images, where one image is one frame of the dinosaur's animation for example.
In this project, we have a simple class called Sprite which is just a handle to the asset path with an image width and height:
class Sprite {
  String imagePath;
  int imageWidth;
  int imageHeight;
}
Layout
This game will be laid out as a Stack with several Positioned elements on it. We'll have the dinosaur which always stays in the same horizontal position and the rest of the world elements that move toward the dinosaur as she runs.
Stack
Dinosaur
Scenery
Cacti
Clouds
At a high level, we're going to break each one of these items out into their own class which is responsible for knowing how to draw its corresponding image, and where it should be on the screen given the state of the world.
GameObject Class
We'll define a GameObject class which defines the basic information every object on the screen should be able to give us:
abstract class GameObject {
  Widget render();
  Rect getRect(Size screenSize, double runDistance);
  void update(Duration lastTime, Duration elapsedTime) {}
}
render() is responsible for returning what this object should look like, independent from its position on the screen. getRect() returns, for the given screenSize and distance that the dinosaur has run, the bounding box for this object.
And finally, update() gives us a way to tell this game object that some time has passed and allow it to update its internal state if necessary. Specifically, we provide the last time the update was called and the overall time that has elapsed since the start of the animation.
NOTE: not every object will need to implement update() so our GameObject class has a default implementation that does nothing.
Let's add a simple Dino class which implements the GameObject interface:
Sprite dino = Sprite()
  // basically a placeholder because we do the sprite animations separately
  ..imagePath = "dino/dino_1.png"
  ..imageWidth = 88
  ..imageHeight = 94;

class Dino extends GameObject {

  @override
  Widget render() {
    return Image.asset(
      dino.imagePath,
      gaplessPlayback: true,
    );
  }

  @override
  Rect getRect(Size screenSize, double runDistance) {
    return Rect.fromLTWH(
        screenSize.width / 10,
        4 / 7 * screenSize.height - dino.imageHeight,
        dino.imageWidth.toDouble(),
        dino.imageHeight.toDouble());
  }
So our render() method just returns an Image asset Widget which refers to a specific sprite of our dinosaur.
getRect() uses Rectangle's constructor fromLTWH which means we construct the Rect from the position of the left edge, the position of the top edge, the width and the height of the rectangle. Therefore this getRect will put the left edge of the dinosaur image a tenth of the way across the screen, and that the top of the dinosaur should be 4/7 of the screen height down minus the height of the image. Finally we take the width and height of the image from the definition of the dino sprite.
Now, in our MyHomePageState class we'll create a Dino() and then in the build method, we'll use it to add our dino to the screen:
Rect dinoRect = dino.getRect(screenSize, 0);
return Scaffold(
      appBar: AppBar(
        title: Text(widget.title),
      ),
      body: Stack(
        alignment: Alignment.center,
        children: [
           Positioned(
            left: dinoRect.left,
            top: dinoRect.top,
            width: dinoRect.width,
            height: dinoRect.height,
            child: dino.render(),
          )
        ],
      ),
    );
So now, we're asking for the rectangle from the dino GameObject and we're using it to position the rendered dino on the screen. We're not keeping track of run distance just yet so we'll just pass in 0 for right now.
And with that we should see our first sign of life:
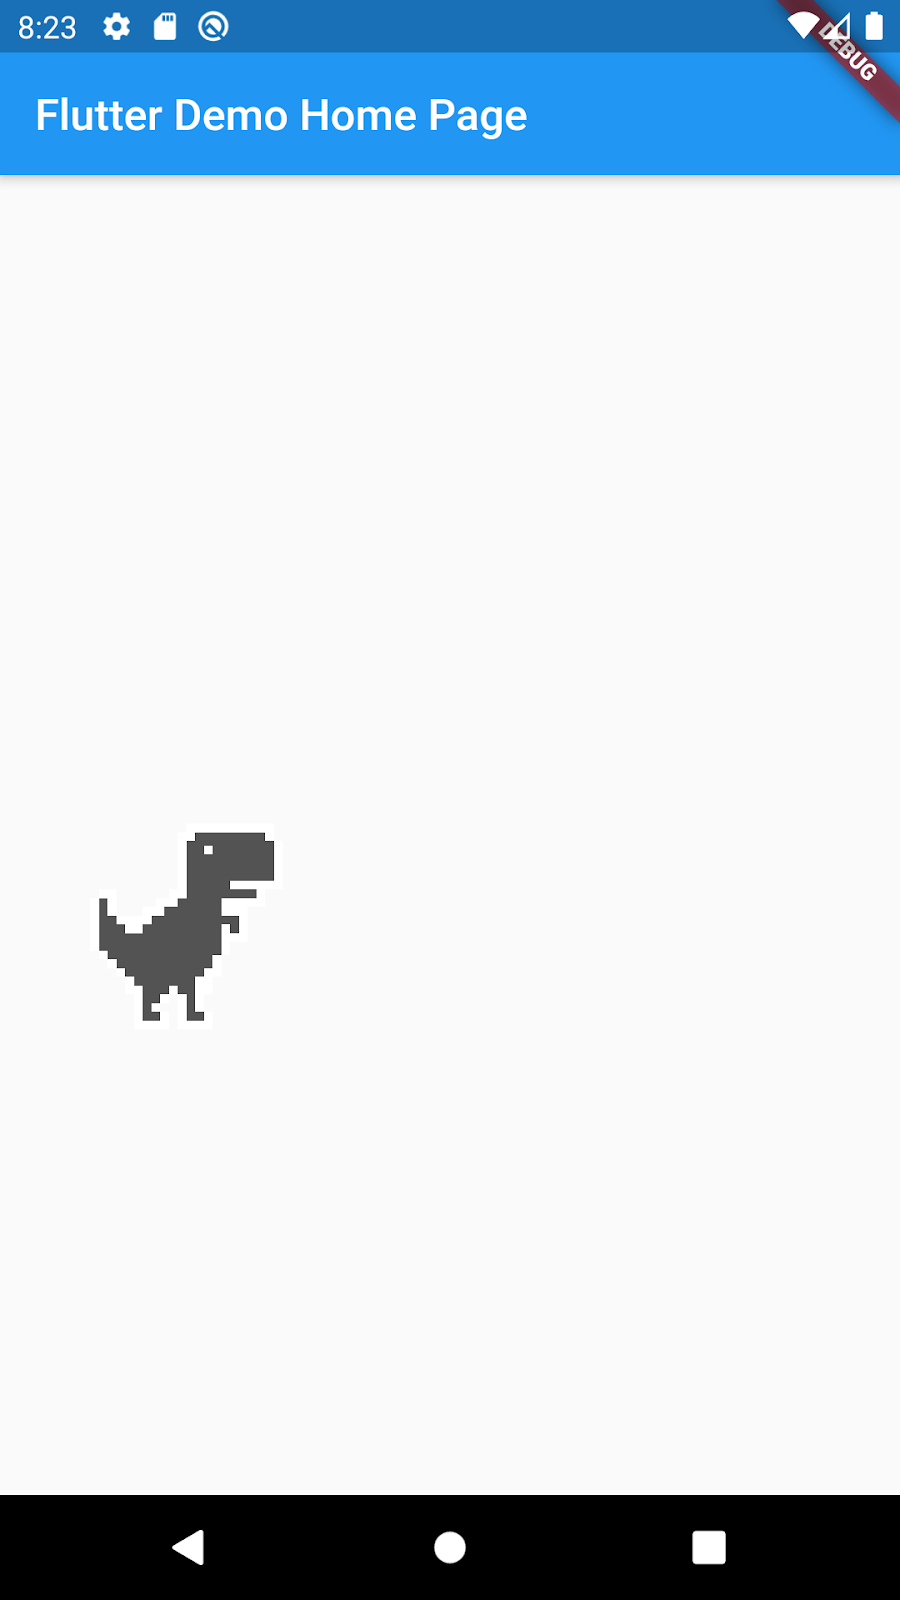
Figure 1: Our Lonely Dinosaur Friend
Run Animation
Okay we've got our dinosaur, let's bring him to life a bit. Let's add a simple run animation. The dinosaur has a couple of sprites that it uses during a run so we're going to update our dino to switch back and forth between those sprites to make it look like she's running.
First, we're going to add our AnimationController and initialize it in our initState method:
 AnimationController worldController;

  @override
  void initState() {
    super.initState();
    worldController =
        AnimationController(vsync: this, duration: Duration(days: 99));
  }
For this game, we're going to be using a single AnimationController which controls everything. That's why we call it the worldController. In addition, we want this worldController to last for the entire session, which is why we set the duration absurdly long. We don't actually want any of our animations to take 99 days to complete :)
Next, we're going to add an update function which gets called every time the animation ticks:
Duration lastUpdateCall = Duration();

@override
void initState() {
  super.initState();
  worldController =
      AnimationController(vsync: this, duration: Duration(days: 99));

  worldController.addListener(_update);
}

void _update() {
  dino.update(lastUpdateCall, worldController.lastElapsedDuration)

  lastUpdateCall = worldController.lastElapsedDuration
}
Okay so we didn't add that many lines but there is quite a bit going on here so let's break it down:
We've added an _update() method to our _MyHomePageState class
We registered the _update() method as a listener to the worldController
We've introduced a new bit of state called lastUpdateCall which is a Duration.
In _update(), we're calling update on our dino, using lastUpdateCall and the worldController.lastElapsedDuration so that it can update its internal state
Finally, we update our lastUpdateCall so we can know how much time has elapsed between the last time a call was made to the update function.
More succinctly, we're now regularly calling update() on our dinosaur with the amount of elapsed time. Unfortunately, we're not actually doing anything with that yet. Our goal is to get the dino to switch back and forth between a couple of frames to make it look like she's running. Let's go back to the dino class and start setting that up:
class Dino extends GameObject {
  int frame = 1;

  @override
  Widget render() {
    return Image.asset(
      "assets/images/dino/dino_$frame.png",
      gaplessPlayback: true,
    );
  }

  @override
  Rect getRect(Size screenSize, double runDistance) {
    return Rect.fromLTWH(
        screenSize.width / 10,
        4 / 7 * screenSize.height - dino.imageHeight,
        dino.imageWidth.toDouble(),
        dino.imageHeight.toDouble());
  }

  @override
  void update(Duration lastTime, Duration elapsedTime) {
    frame = (elapsedTime.inMilliseconds / 100).floor() % 2 + 3
  }
}
We've added a frame field to our dino class, and now we're setting that when update is called.
To break down our formula for frame:
frame = (elapsedTime.inMilliseconds / 100).floor() % 2 + 3
we want our frame to switch every 100 milliseconds, which is why we're dividing elapsedTime.inMilliseconds by 100. This division will give us a double and we only have integer frame numbers so we use floor() to truncate it to an integer. Next, our run animation just has two frames so we use the modulo operator (%) to output 0 or 1 depending on whether the number is even or odd. Finally, the frames of our run animation are 3 and 4 so we add 3 to the output of the modulo to have our dinosaur flip back and forth between frames 3 and 4.
Alright so, the dinosaur class should be updating in response to the animation controller but we need to do a couple final things before we start to see our dinosaur run:
  @override
  void initState() {
    super.initState();
    worldController =
        AnimationController(vsync: this, duration: Duration(days: 99));

    worldController.addListener(_update);

    worldController.forward();
  }
For right now, in our initState we'll start our worldController and then finally we'll wrap our dino widgets in an animated builder:
  return Scaffold(
      appBar: AppBar(
        title: Text(widget.title),
      ),
      body: Stack(
        alignment: Alignment.center,
        children: [
          AnimatedBuilder(
            animation: worldController,
            builder: (context, child) {
              Rect dinoRect = dino.getRect(screenSize, 0);
              return Positioned(
                left: dinoRect.left,
                top: dinoRect.top,
                width: dinoRect.width,
                height: dinoRect.height,
                child: dino.render(),
              );
            })
        ],
      ),
    );
Now, we should see our dino dance!
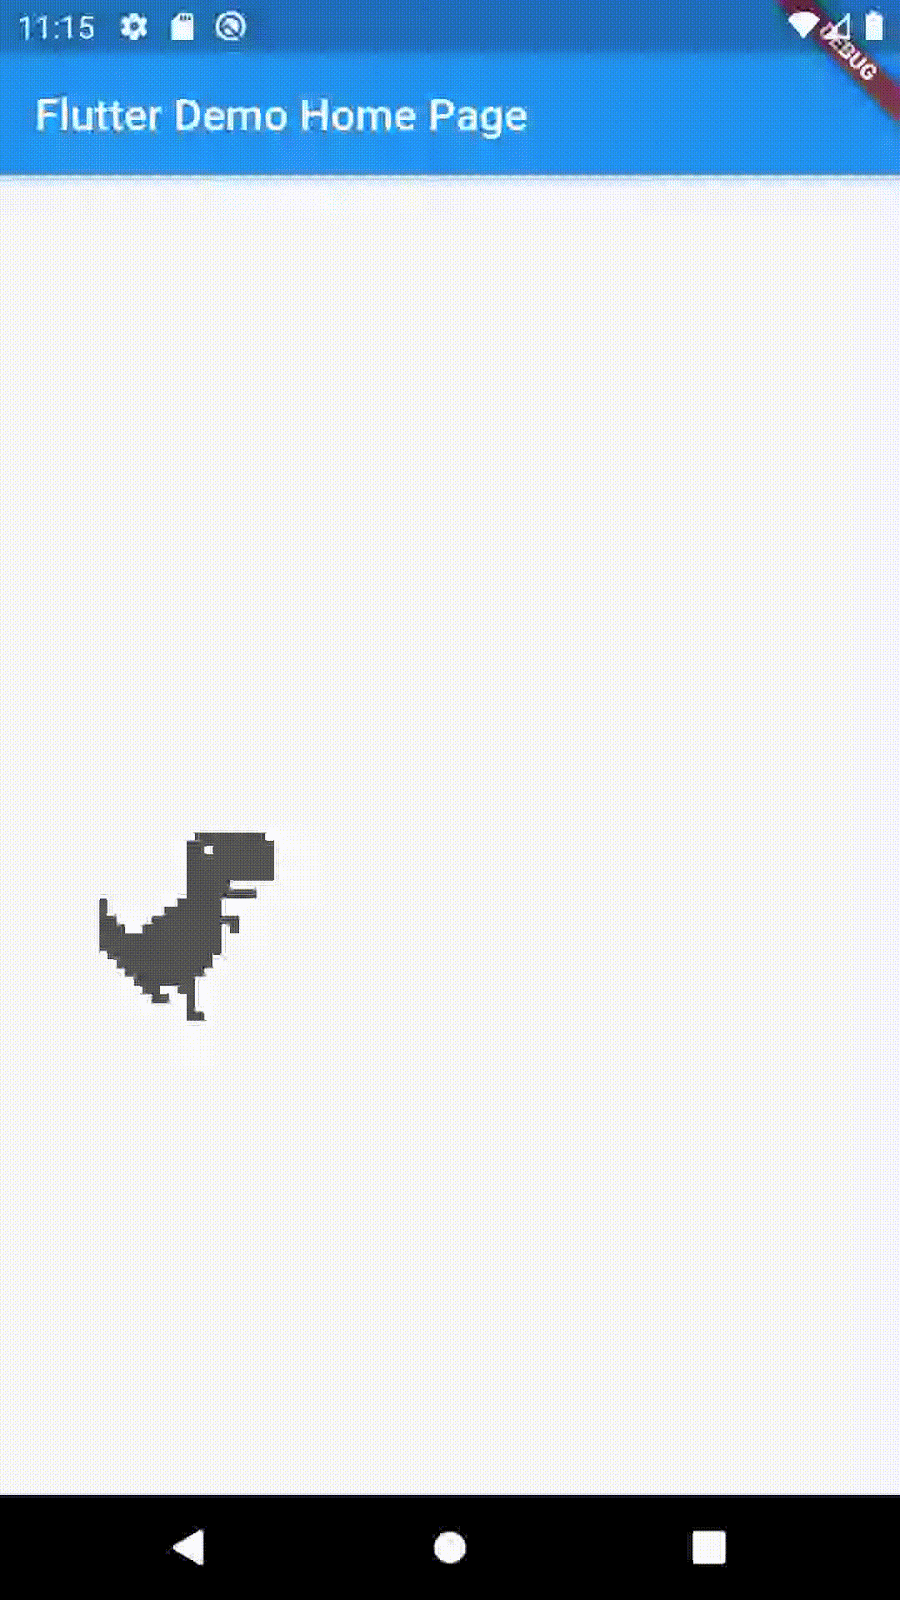
Figure 2: Twinkle Toes Dino
We've introduced animations to our dinosaur but he's still not interactive at all. Let's add a way to make our dinosaur jump.
First, we'll add a jump() method to our Dino class. In order to implement our jump, we'll want to add dispY and velY parameters to the dinosaur. These will represent displacement from the ground and the velocity respectively. They'll allow us to physically simulate behavior of the dinosaur jumping. Next, we'll consume those parameters when we're returning our rectangle for the dino (note the additional displacementY term):
  @override
  Rect getRect(Size screenSize, double _) {
    return Rect.fromLTWH(
        screenSize.width / 10,
        4 / 7 * screenSize.height - dino.imageHeight - dispY,
        dino.imageWidth.toDouble(),
        dino.imageHeight.toDouble());
  }
Next, in our update call, we'll update these parameters:
@override
void update(Duration lastTime, Duration elapsedTime) {
  double elapsedSeconds =
      ((elapsedTime.inMilliseconds - lastTime.inMilliseconds) / 1000);

  dispY += velY * elapsedSeconds;
  if (dispY <= 0) {
    dispY = 0;
    velY = 0;
  } else {
    velY -= GRAVITY_PPSPS * elapsedSeconds;
  }

  frame = (elapsedTime.inMilliseconds / 100).floor() % 2 + 3
}
In our modified update() method, we calculate the fractional seconds that have elapsed since the last time our dino was updated. Then we use that to update the current displacement by adding the velocity multiplied by the elapsed time.
If the displacement winds up being below 0, we reset displacement and velocity to 0, otherwise we update the velocity to simulate gravity by constantly reducing the velocity by constant amount. GRAVITY_PPSPS represents the gravity in pixels per second per second (hence PPSPS). We're using a value of 2000 for GRAVITY_PPSPS.
Finally we're still setting our frame accordingly.
Okay so we're correctly maintaining our values in our update method, the last thing we need to do is implement the jump() method. This is actually the easiest part:
void jump() {
  velY = 650;
}
All we do is give the dino an upward velocity, and we let the update method do the heavy lifting.
So that's all well and good but we still need a way to translate the user's tap into a call to the dino's jump() method. Let's do that:
return Scaffold(
  appBar: AppBar(
    title: Text(widget.title),
  ),
  body: GestureDetector(
    behavior: HitTestBehavior.translucent,
    onTap: () {
      dino.jump();
    },
    child: Stack(
      alignment: Alignment.center,
      children: children,
    ),
  ),
);
We've wrapped our Stack in a GestureDetector and we've defined an onTap() callback to call dino.jump().
And that should be enough to get our dino jumping:

Figure 3: Dino Friend sets her sights on the skies
Unfortunately, we've imbued our dino buddy with a bit too much power. If you try tapping multiple times, you'll find that the dinosaur can jump infinitely high. Kind of fun but defeats the purpose of the game.
Limiting Double (Triple, etc) Jumps
We only want our dinosaur to be able to jump once. To do this we'll add the concept of a state to our dino. By default it will be "running" but when the user taps the button the state will switch to "jumping". Once the dino touches back down, we'll switch back to running. While the dinosaur is in the "jumping" state we'll ignore any subsequent requests to jump.
Here is our DinoState class for right now:
enum DinoState {
  running,
  jumping,
}
And we'll add a "state" field to the Dino class which we'll initialize to DinoState.running and then in our jump method we'll make sure that we're not jumping before we update the vertical velocity:
void jump() {
  if (state != DinoState.jumping) {
    velY = 650;
  }
}
Adding Obstacles
Jumping randomly in a white void is cool but let's give our Dinosaur friend some obstacles to jump over. We'll start by adding a new Cactus class that implements GameObject:
class Cactus extends GameObject {
  // This is the location of the cactus in "world" coordinates which is translated to "screen" coordinates
  final Offset worldLocation;
  final Sprite sprite;

  Cactus({this.location}) : sprite = CACTI[Random().nextInt(CACTI.length)];

  @override
  Rect getRect(Size screenSize, double runDistance) {
    return Rect.fromLTWH(
        (location.dx - runDistance) * WORLD_TO_PIXEL_RATIO,
        4 / 7 * screenSize.height - sprite.imageHeight - location.dy,
        sprite.imageWidth.toDouble(),
        sprite.imageHeight.toDouble());
  }

  @override
  Widget render() {
    return Image.asset(
      sprite.imagePath,
    );
  }
}
Now that we've laid the groundwork, there's not that much work we need to do to create a cactus game object but let's walk through our cactus implementation.
So we have an offset which represents the logical location for this cactus and a Sprite which represents which cactus picture to use for this particular instance of cactus object. In the constructor for cactus, we accept the location and just randomly choose a sprite from a predefined list of cacti.
Then we have getRect() which is where things start to get a bit more interesting. To correctly position our cactus we now need to know how far the dinosaur has run. Let's break this down:
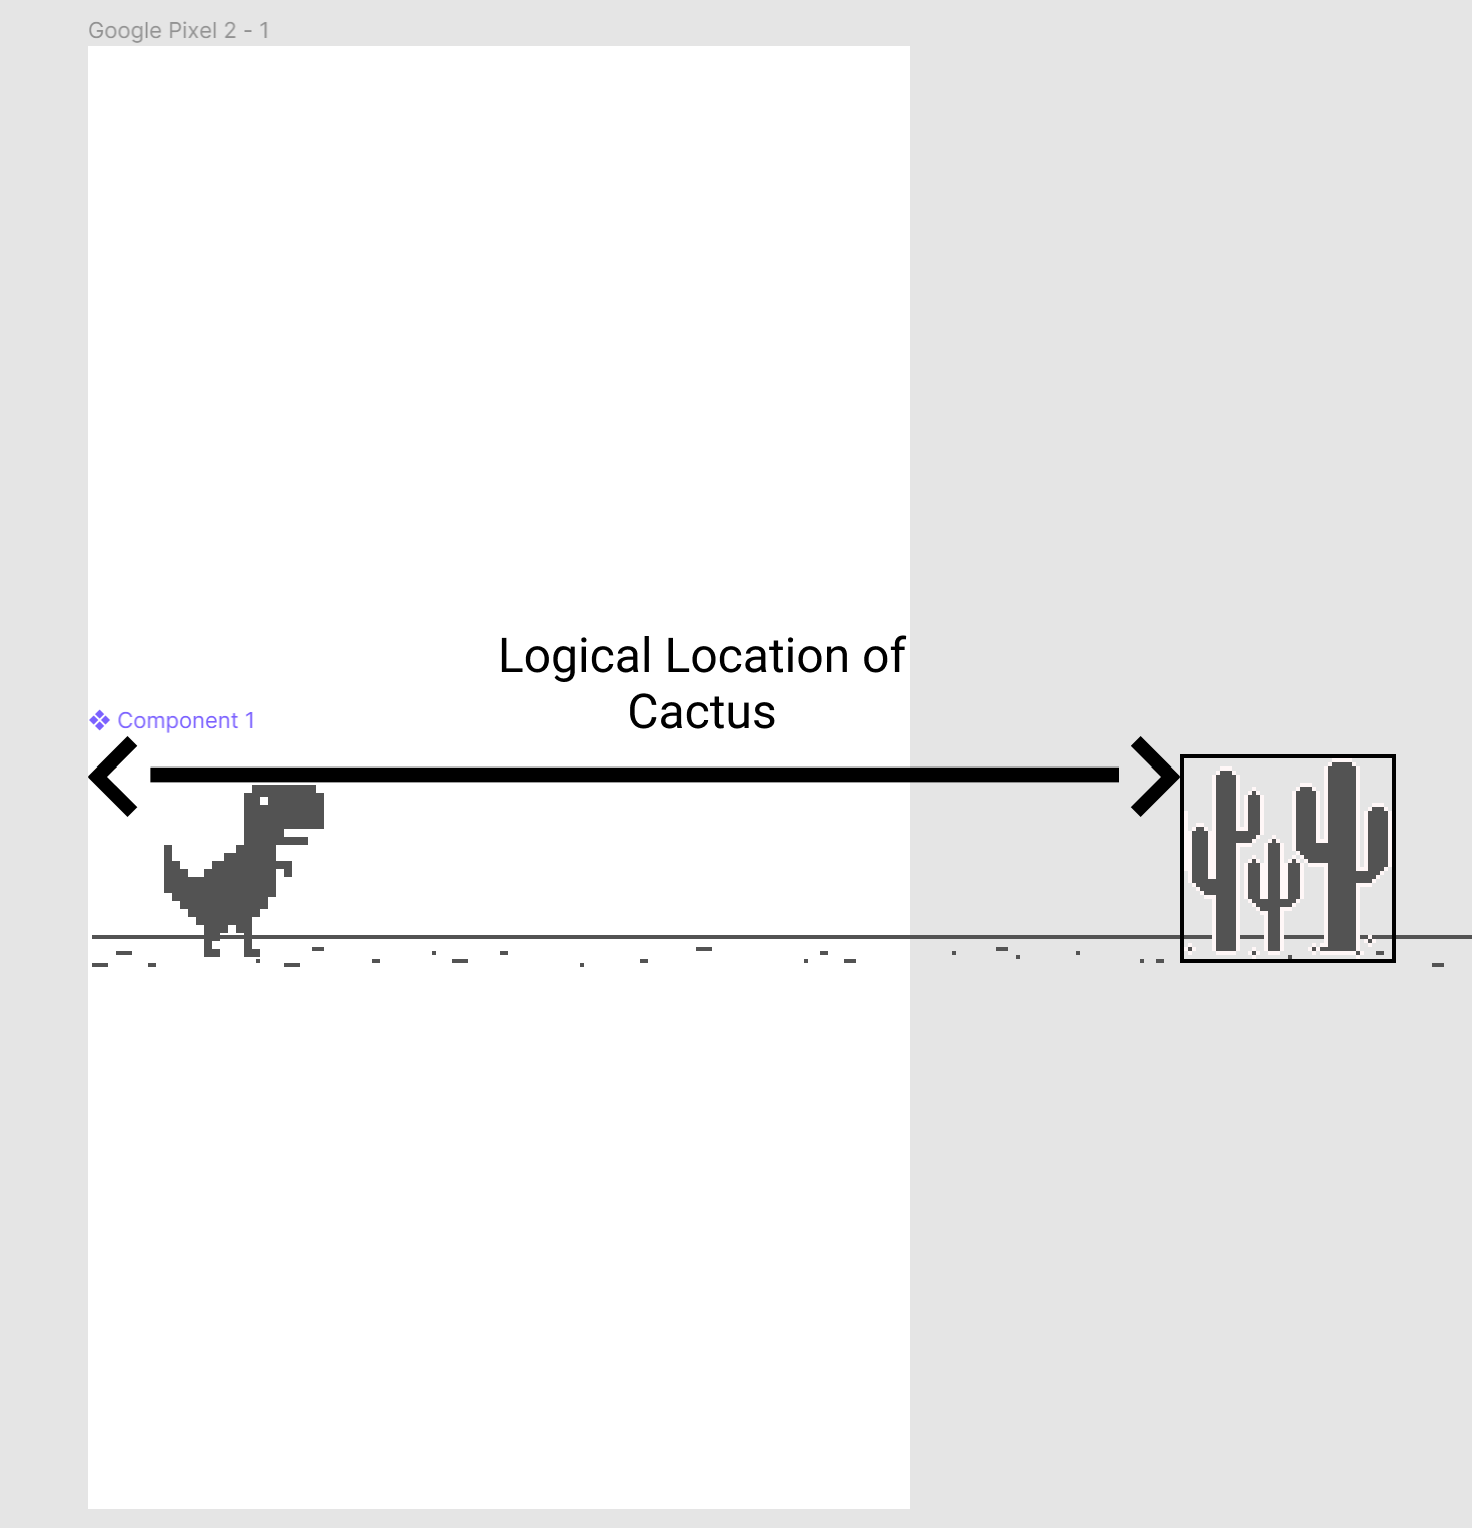
Figure 4: A visual interpretation of the location of Cacti
The left edge of the arrow in this picture is at runDistance 0, and the right edge of the arrow is the dx coordinate of the location Offset. As the dinosaur runs, the location of the cactus doesn't change but the position of the screen relative to the world does. In order to output the correct value to position the cactus in the stack, we need to consider the logical location of the cactus, and the distance that the dinosaur has run:
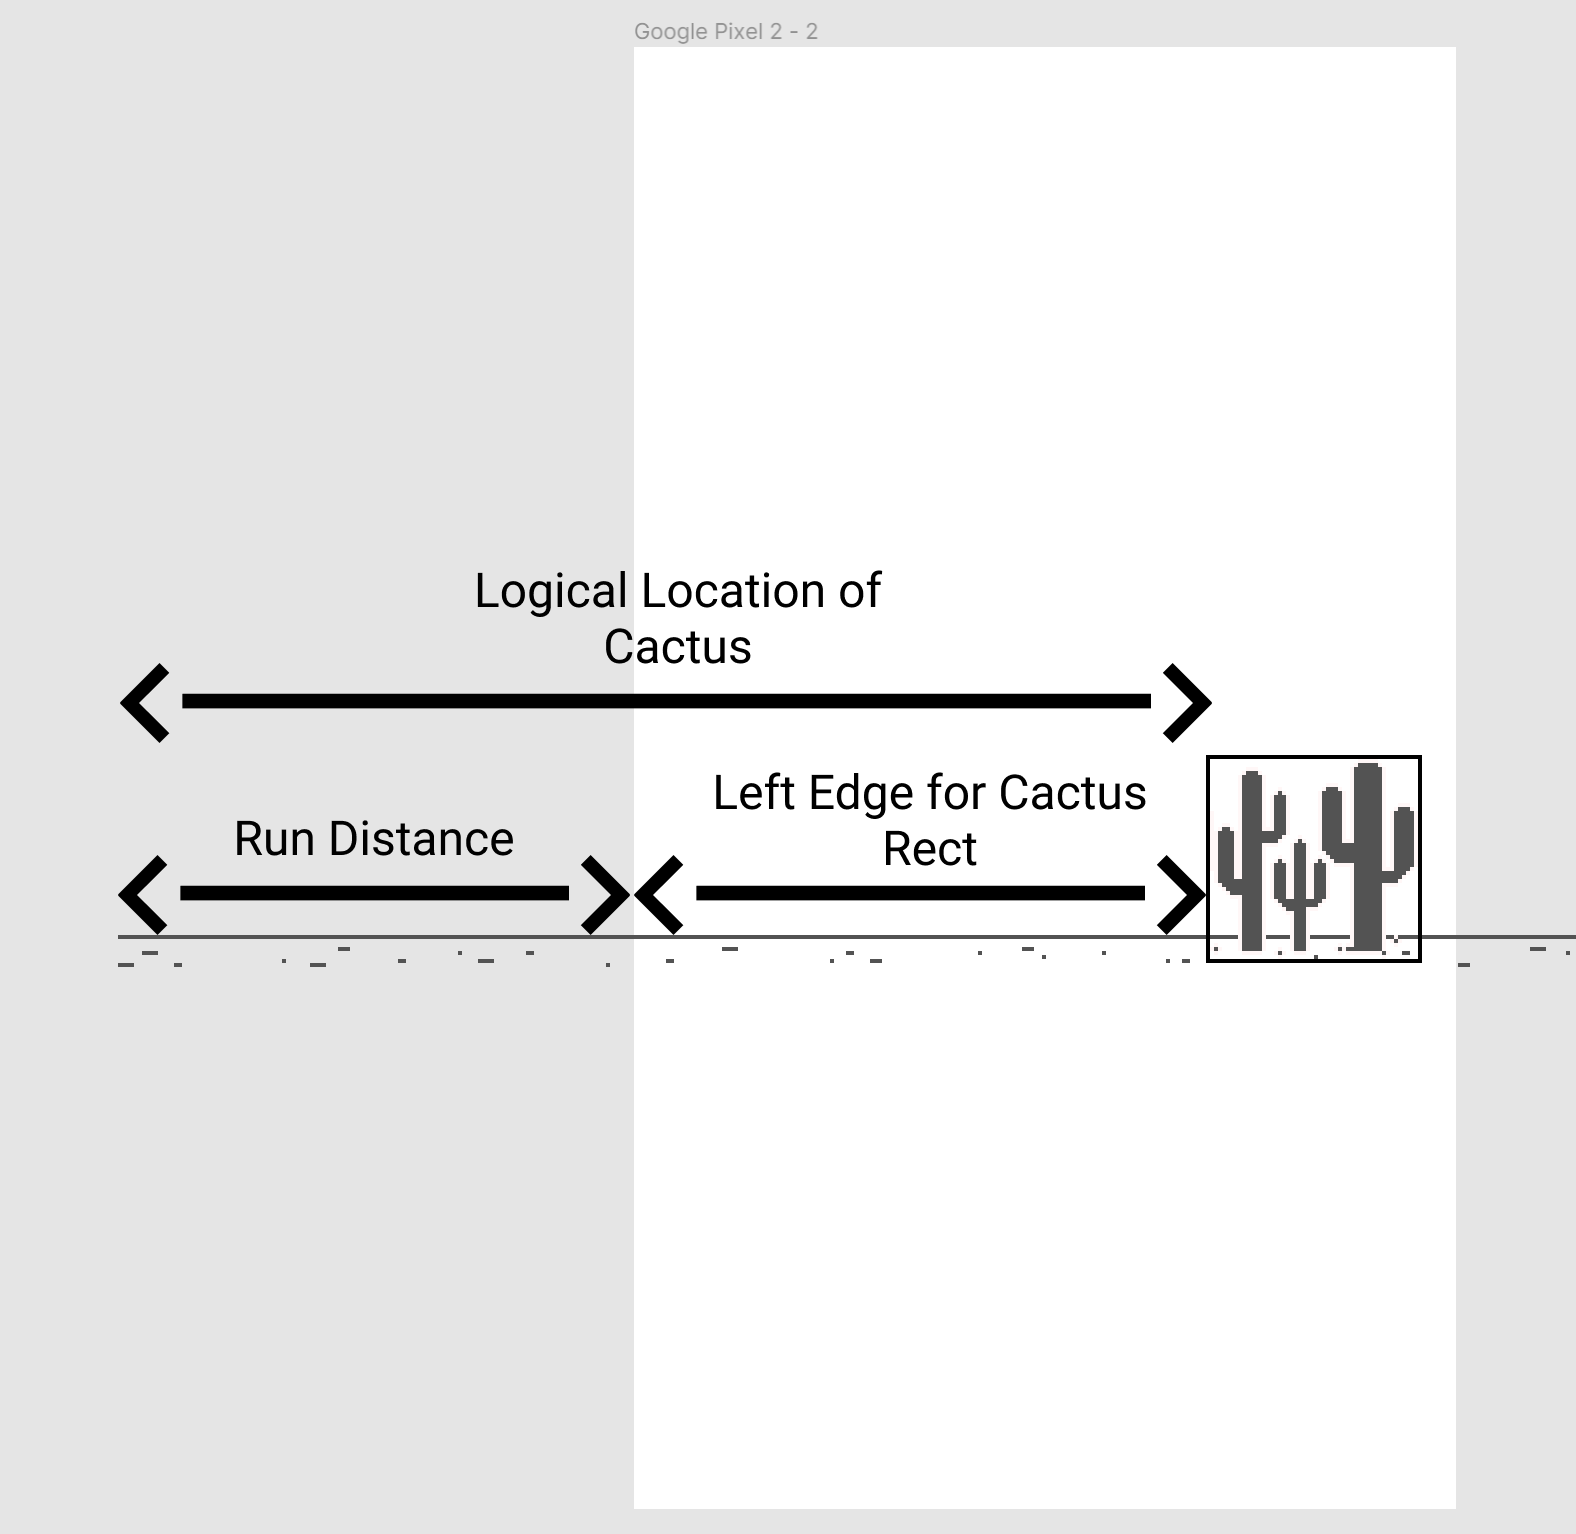
Figure 5: A visual representation of the left edge for the rectangle returned by getRect() for the cacti
As the dinosaur (hidden here for clarity) moves, so does the screen. So in order to figure out how to position the cactus on the screen, we need to know how far the dinosaur, and, by extension, the screen, has moved. Then we subtract the amount the dinosaur has run from the logical location of the cactus, to determine what to put for the left edge of the Rect for getRect().
(location.dx - runDistance) * WORLD_TO_PIXEL_RATIO
Finally, the last part of the left edge of the rectangle is to multiply by 10 and that's simply to scale from the logical space of the runDistance and cactus position to the pixel space of the screen. The top, width and height values for the Rect are almost exactly the same as for the dino.
For the render method we just use the asset referenced in the configured Sprite.
This should be it for our Cactus GameObject now we just need to add a few of them to our world.
In our _MyHomePageState class we will add a List<Cactus> which we'll call obstacles and for right now we'll just set it to a hard coded value:
List<Cactus> obstacles = [
  Cactus(location: Offset(200, 0)),
];
Then in our build method, we'll separately construct our children List for the Stack loop through the obstacles and add each one to the List:
for (GameObject object in [...obstacles, dino]) {
  children.add(
    AnimatedBuilder(
        animation: worldController,
        builder: (context, child) {
          Rect objectRect = object.getRect(screenSize, runDistance);
          return Positioned(
              top: objectRect.top,
              left: objectRect.left,
              width: objectRect.width,
              height: objectRect.height,
              child: object.render());
       }),
  );
}
NOTE: Since dino is a GameObject, we can include it in the list of game objects to add to the screen.
And finally, we set the children parameter of the stack to be our new children list.
The last thing we'll need to do to get the cacti showing up is to start keeping track of the runDistance. We'll add a couple more fields to our _MyHomePageState class, runDistance and runSpeed.
void _update() {
  double elapsedSeconds =
        ((worldController.lastElapsedDuration.inMilliseconds -
                lastUpdateCall.inMilliseconds) /
            1000);

  runDistance = max(runDistance + runSpeed  elapsedSeconds, 0);
  runSpeed += RUN_SPEED_ACC_PPSPS  elapsedSeconds;

  dino.update(lastUpdateCall, worldController.lastElapsedDuration);

  lastUpdateCall = worldController.lastElapsedDuration
}
So very similarly to the jump, we update the run distance according to the velocity and the amount of time that has elapsed and we have an acceleration for the run speed (RUN_SPEED_ACC_PPSPS) to increase the game's difficulty over time.
With those changes, we should be correctly maintaining the value of runDistance over time and if we play again we should see our cactus:

Figure 6: Dino meets an incorporeal Cactus
And voila! we've got some moving obstacles! Unfortunately they aren't very obsticular presently so we'll need to add the ability for our dino to collide with these cacti.
Collision
Now collision can be a fairly complicated concept in video games but we're going to keep it simple and just check if the corresponding rectangles are touching. Technically, this can lead to sub-optimal results where it looks like it should have allowed it but I'm the one driving this blog post and I decide how complicated we make our collision implementation!
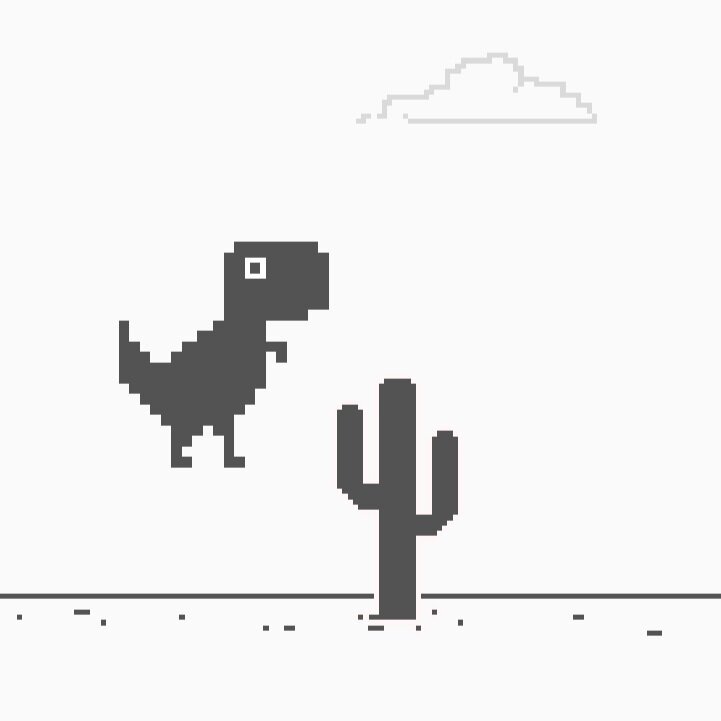
Figure 7: “I can’t believe you’ve done this”
Perhaps unsurprisingly, we'll implement collisions by adding a check in our _update() method. We'll iterate over the obstacles and see if our dinosaur is currently colliding with any of the obstacles. Luckily, Flutter's Rect has a handy overlaps() method which allow us to easily check if the assets are touching.
Size screenSize = MediaQuery.of(context).size;

Rect dinoRect = dino.getRect(screenSize, runDistance).deflate(15);
for (Cactus obstacle in obstacles) {
  Rect obstacleRect = obstacle.getRect(screenSize, runDistance);
  if (dinoRect.overlaps(obstacleRect.deflate(15))) {
     _die();
  }
}
So we get the Rects for the dino and the cacti and we check if they overlap. In addition, we deflate the rectangles a bit to eliminate some of the more egregious cases of invalid collisions. If they collide then we call a _die() method which should look something like this:
void _die() {
  setState(() {
    worldController.stop();
    dino.die();
  });
}
We stop the world and call die() on the dino which looks like this:
void die() {
  state = DinoState.dead;
  frame = 6;
}
We set state to a newly-added DinoState.dead enum value and we set our dino frame to 6 which is the dead dino sprite:
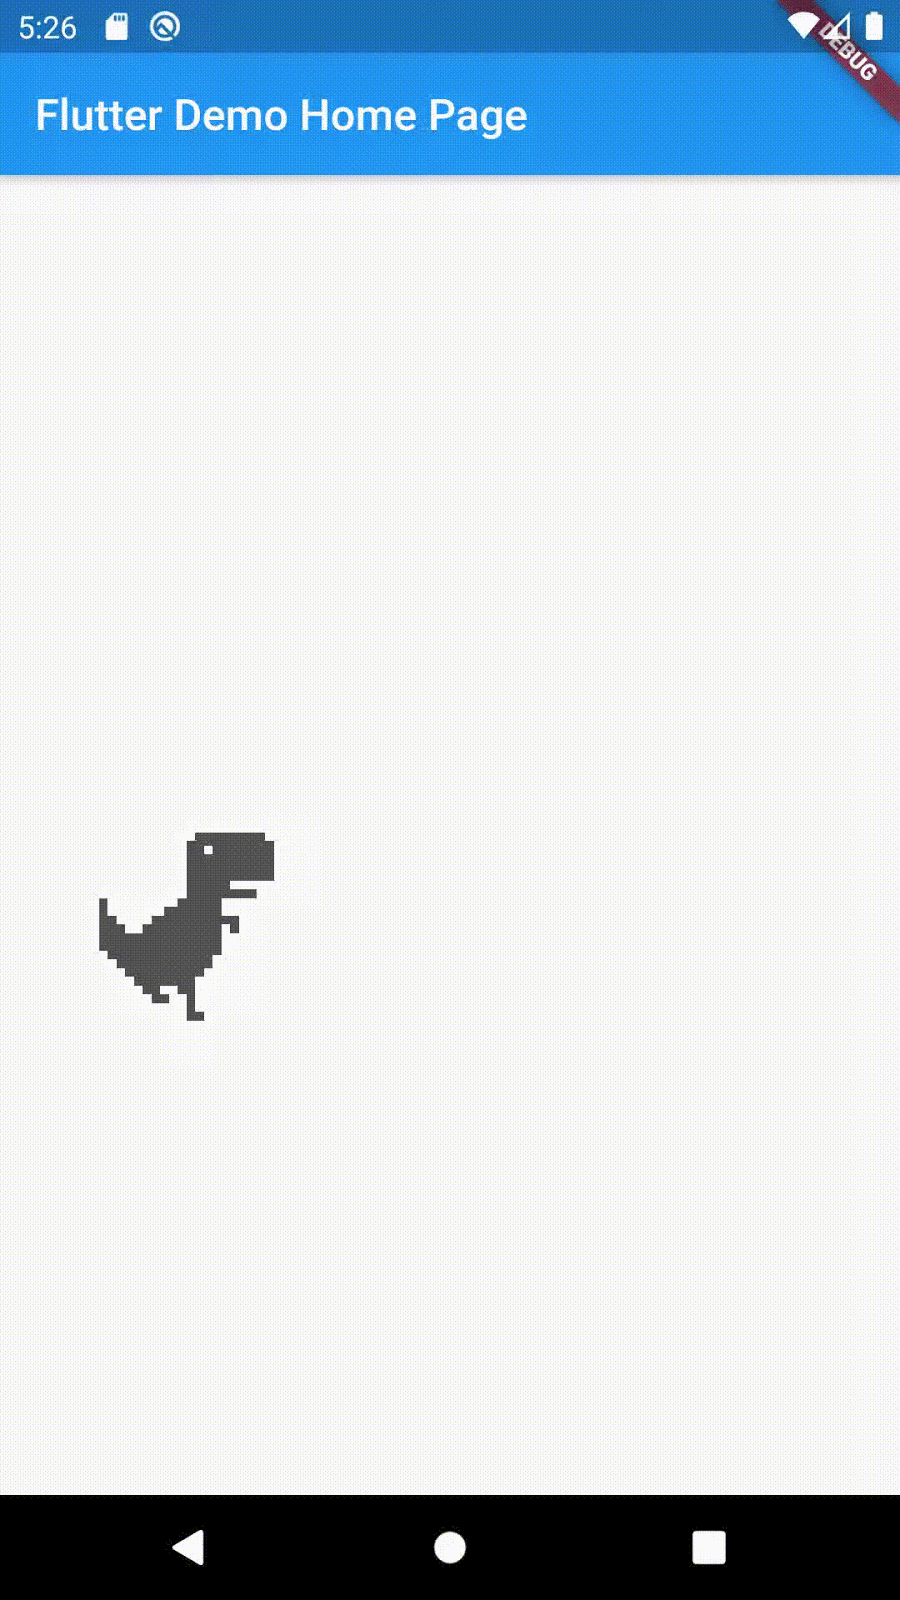
Figure 8: Don’t let the dino’s cute countenance fool you, she’s in unimaginable pain.
Dynamically Adding Obstacles
Right now, we just have a single hard-coded obstacle in our list so if we avoid that one, there's nothing else so let's extend our app to continually add new obstacles. In addition, we have another problem which is that once the cactus is off the left side of the screen we will never see it again so we shouldn't waste time adding it to the widget tree or checking for collisions. Luckily we'll kill both of these birds with one stone.
As we're iterating through the cacti, when we see that a cactus has moved past the edge of the screen, we'll remove it from the list of obstacles and add a new one somewhere ahead of the dinosaur. This is what that looks like:
Rect dinoRect = dino.getRect(screenSize, runDistance).deflate(15); for (Cactus obstacle in obstacles) { Rect obstacleRect = obstacle.getRect(screenSize, runDistance); if (dinoRect.overlaps(obstacleRect.deflate(15))) { _die(); }if (obstacleRect.right < 0) { setState(() { obstacles.remove(obstacle); obstacles.add(Cactus( location: Offset(runDistance + rand.nextInt(100) + 50, 0))); }); } }
In our existing loop through the obstacles for checking for collisions, we also check if the right edge of the obstacle is less than 0 which will mean that no part of the cactus is on the screen any more. At that point, we remove this cactus from the list of obstacles and create a new cactus which is set a randomized distance beyond the current run distance.
So with this we should have an endless stream of cacti to keep our dino busy.
Scenery
So we have the core elements of the gameplay but our game is a bit barren right now. Let's add the ground image and the clouds.
Conceptually, both of these are going to be very similar to the principles we employed with the Cacti.
Let's look at the new ground class:
Sprite groundSprite = Sprite()
  ..imagePath = "assets/images/ground.png"
  ..imageWidth = 2399
  ..imageHeight = 24;

class Ground extends GameObject {
  // this is a logical location which is translated to pixel coordinates
  final Offset location;

  Ground({this.location});

  @override
  Rect getRect(Size screenSize, double runDistance) {
    return Rect.fromLTWH(
        (location.dx - runDistance)  10,
        4 / 7  screenSize.height - groundSprite.imageHeight - location.dy,
        groundSprite.imageWidth.toDouble(),
        groundSprite.imageHeight.toDouble());
  }

  @override
  Widget render() {
    return Image.asset(
      groundSprite.imagePath,
    );
  }
}
This should feel pretty familiar. This is almost exactly the same as the Cactus class. The main difference is that there is only one image for the ground so we don't need to have the sprite as a field on the class.
The most interesting part of the implementation is that we want there to be a seamless continuation between the images. The way we do that is by switching between two image assets when one is off the screen we switch it to the back. Not dissimilar to Gromit here:

Figure 9: A useful metaphor for life AND our scenery replacement strategy
We'll add a new ground field to our class which is a list of Ground objects and we'll initialize it as follows:
ground = [
  Ground(location: Offset(0, 0)),
  Ground(
    location: Offset(groundSprite.imageWidth / WORLD_TO_PIXEL_RATIO, 0))
];
So we set up our widget with two tiles to begin with, and then when one of the tiles move off the screen we move it to the back using similar logic in our global update method:
if (groundlet.getRect(screenSize, runDistance).right < 0) {
  setState(() {
    ground.remove(groundlet);
    ground.add(Ground(
        worldLocation: Offset(
            ground.last.worldLocation.dx +
                groundSprite.imageWidth / WORLD_TO_PIXEL_RATIO,
            0)));
    });
}
AKA we're setting the world location of the new tile to be right at the end of the last tile. This location is determined by taking the size of the asset in pixels and dividing by the WORLD_TO_PIXEL_RATIO which gives us the width of the image in world coordinates.
Finally, we need to add the ground to the widget tree:
for (GameObject object in [...ground, ...obstacles, dino]) {
  children.add(
    AnimatedBuilder(
        animation: worldController,
        builder: (context, child) {
          Rect objectRect = object.getRect(screenSize, runDistance);
          return Positioned(
              top: objectRect.top,
              left: objectRect.left,
              width: objectRect.width,
              height: objectRect.height,
              child: object.render());
       }),
  );
}
For the clouds, the process is almost exactly the same:
Create the cloud class
Add a list of clouds
Update the list of clouds when a cloud moves off the edge of the screen
Add the cloud widgets to the widget tree
The main differences are:
We'll allow there to be up to 3 clouds on the screen at a time so we'll initialize our list with 3 clouds
We want to create a "parallax" effect where we make the clouds seem farther away by having them move more slowly than the rest of the scenery.
We generate some randomness in the y coordinates so the height of the cloud is varied a bit.
Achieving the Cloud Parallax Effect
When rendering the clouds to the screen, instead of using the standard WORLD_TO_PIXEL_RATIO, we'll use a smaller value so that comparable changes in run distance translate into smaller changes in the clouds. This manifests itself as a change to the implementation of getRect():
@override
Rect getRect(Size screenSize, double runDistance) {
  return Rect.fromLTWH(
      (location.dx - runDistance)  WORLD_TO_PIXEL_RATIO / 5,
      2 / 7  screenSize.height - cloud.imageHeight - location.dy,
      cloud.imageWidth.toDouble(),
      cloud.imageHeight.toDouble());
}
So instead of using WORLD_TO_PIXEL_RATIO directly, we divide it by 5 so that we get the slower moving behavior that we're looking for.
In addition, we position the clouds higher in the sky so the top of the clouds is 2/7 of the way down the screen instead of the rest of the assets which are down at 4/7ths.
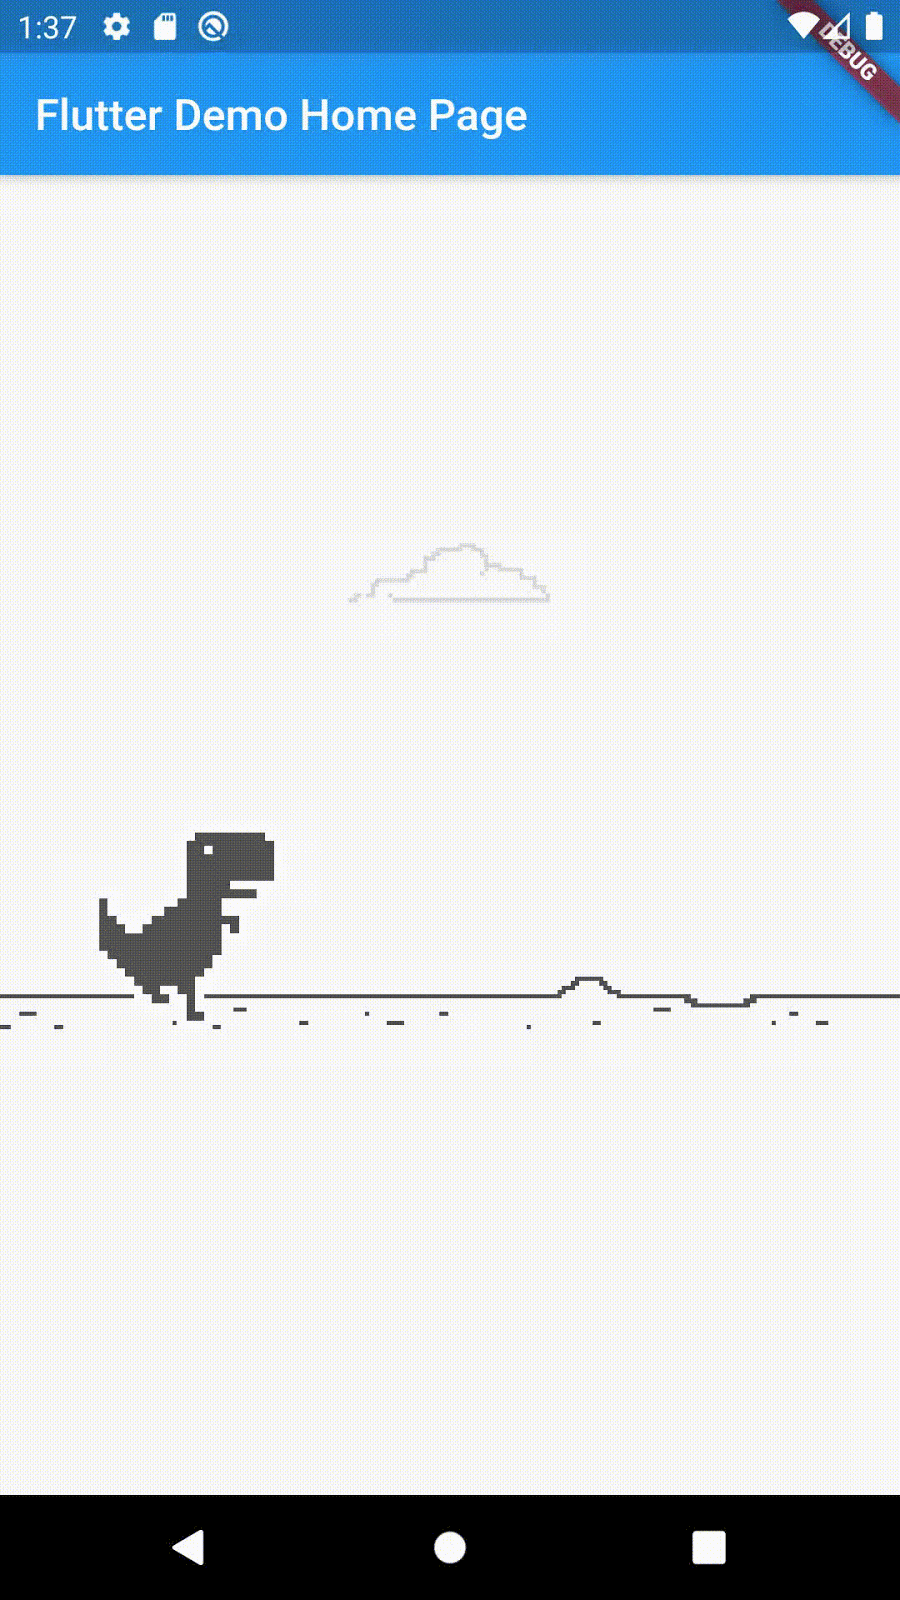
Figure 10: Our final result
So there it is, we've got the core elements of the dinosaur game. To recap, we've covered:
Creating a game loop in Flutter
Creating sprite-based animations
Controlling a character via user input
Simple collision detection
Creating a scene with parallax
We're going to stop this article here but if you wanted to completely finish the game, you could:
Add the pterodactyl which is a flying obstacle
Add current and high score UI
Add the ability to reset the game and start playing again.
Variable length jumping
But these tasks are left as an exercise for the reader :)
Thanks for checking this post out!